According to a recent study, the majority of models die in a jupyter notebook. They never have the opportunity to reach production and demonstrate their ability to the rest of the world. MLOps is critical in putting a model into production. This article might serve as an important first step in getting you Deploy EC2 instance App concept through Managed AWS Cloud.
In this post, I’ll try to give you an idea of how to deploy a tiny Python app to production. I’m going to deploy a tiny calculator App I made on my local PC to an Amazon Web Service (AWS)-EC2 instance. I am delighted to share this knowledge with you, and I hope you are as well. So, enough with the theory; let’s get our hands dirty.
Steps to take for this app deployment :-
- Creating and Launching EC2 instance on AWS
- SSH and File transfer to Protocol
- Gunicorn and Nginx setup in Console.
Step — 1 :- Creating and Launching EC2 instance on AWS
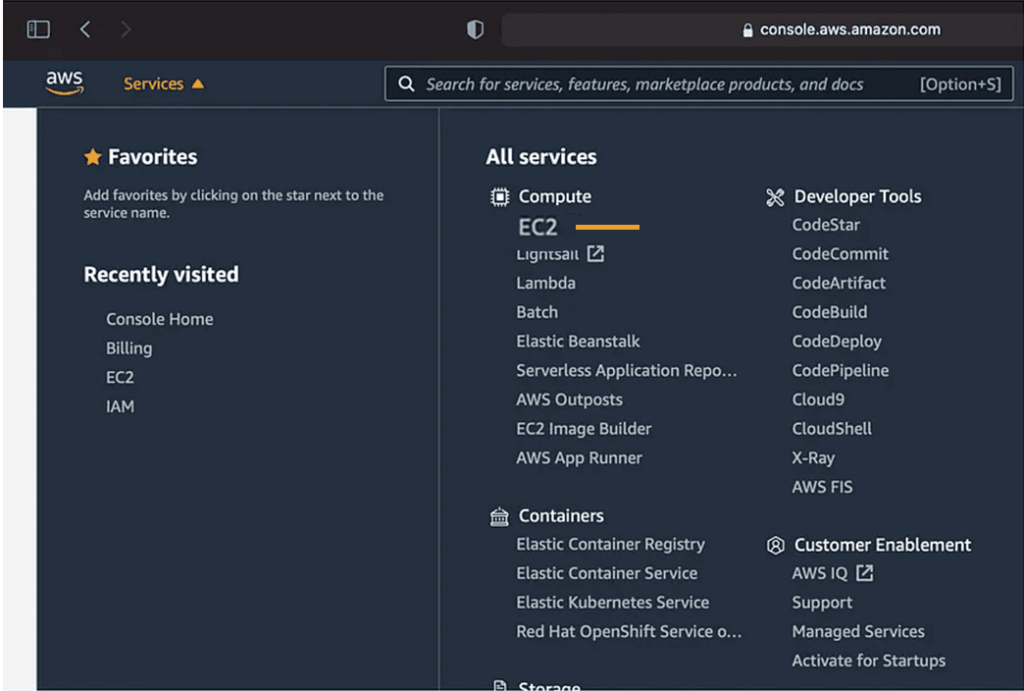
a. Open the Managed AWS Cloud console and select EC2 instance
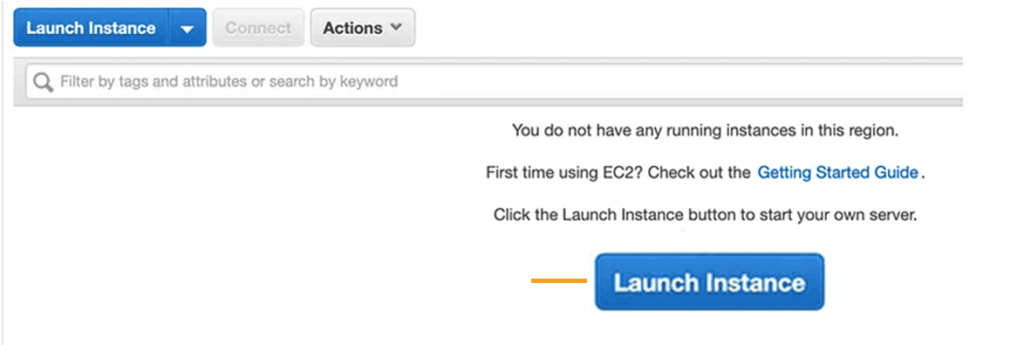
b. Select the instance to launch.
c. Select the machine image Ubuntu Server 18.04 LTS (HVM), SSD Volume Type from the list.

d. Select the appropriate type, in this case t2.micro for demonstration purposes. Then click the “Configure Instance Details” button.
f. Select “Add Storage” now.
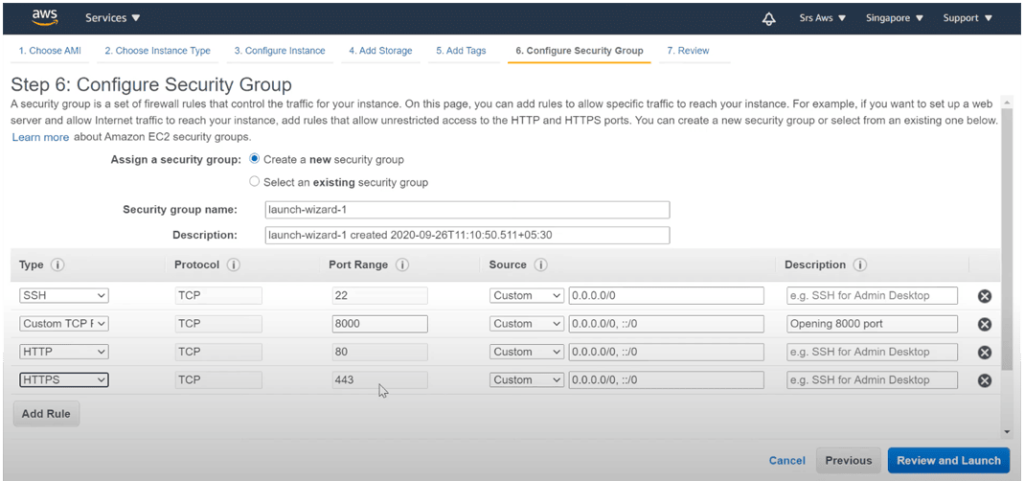
f. Choose the storage size according on your needs; in this case, 15 GB. Then click “Add Tags” and then “Select Configure Security Group.”
g. Configure the settings as shown in the image below or as needed.
h. Check that your project’s build folder has all of the files required for your application to execute successfully. Adapt the paths and instructions to your project’s structure and requirements.
i. It will prompt you to pick a key pair. Here, you may choose Create a new key pair, name it, and download the Key Pair file. (I’ve labeled it PythonAppDeploy4)
j. Finally, save the settings file and finish the text editor’s job. Once finished, exit. To have the appropriate rights to alter the file, use sudo before the text editor command.
As a result, an EC2 instance has been established. It’s now time to use SSH and transfer files. I’m demonstrating the procedures for Mac/Linux users, but they’re almost identical for Windows users as well. The only variation between the commands will be the tool.
Step 2: SSH and File Transfer on the Mac:-
For SSH, use Terminal, and for file transfers to the instance, use FileZilla.
For Windows, use Mobaxterm to do both SSH and file transfers.
We will utilize SSH to deploy the app to the instance from a local terminal. I curated it in a very simple manner. Simply follow the steps and you’ll be fine.
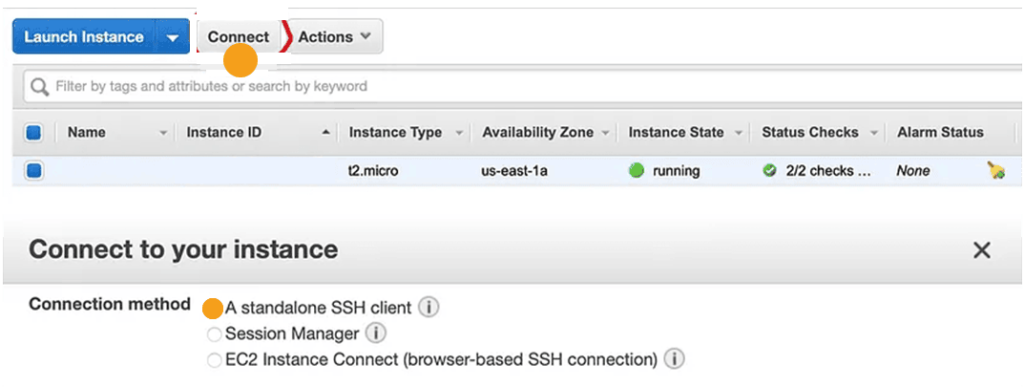
Click the connect button on your EC2 instance, as indicated in the image below.
Now, in your local system, open the terminal and navigate to the directory where you downloaded the Key Pair file (in my instance, it’s in the download folder as PythonAppDeploy4.pem).
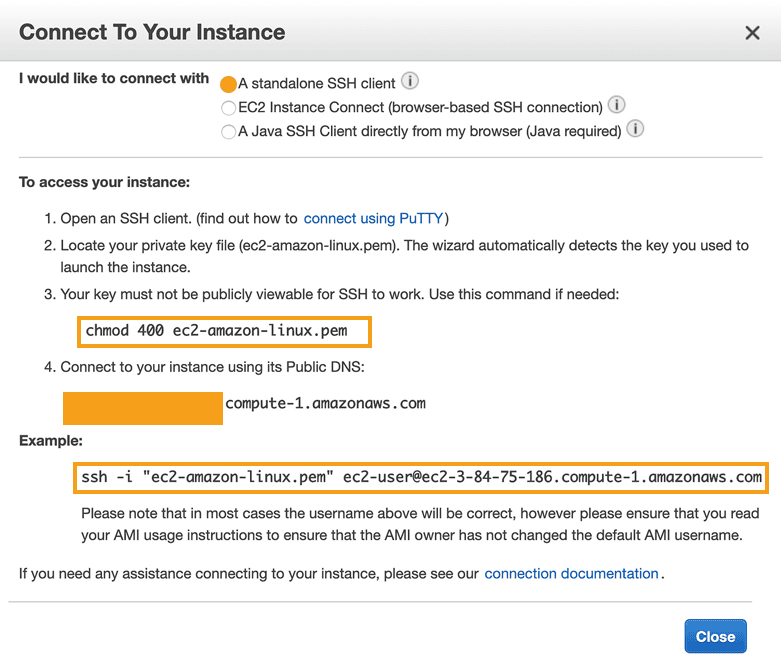
In the local terminal, type chmod 400 PythonAppDeploy4.pem.
[chmod 400 => Allows the user to read while removing all other permissions]
Enter the second command from the preceding image:- ssh -i “PythonAppDeploy4.pem” ubuntu@XXXXXXXXXXXXXX.compute-1.amazonaws.com
This will grant you SSH access to your newly formed EC2 instance.
It’s now time to upload your file (in my example, calculator.zip) from your local machine to your instance. We will use the FileZilla utility for this.
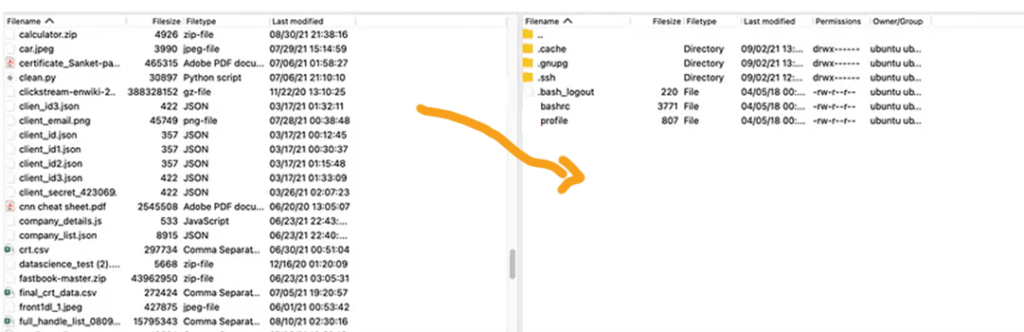
So, finally SSH and upload of App done. Let’s check it into our terminal.

As a result, we can see that our file was successfully uploaded to the instance. Now we’re ready to launch our app, but first let’s download some prerequisites using the code snippet below.
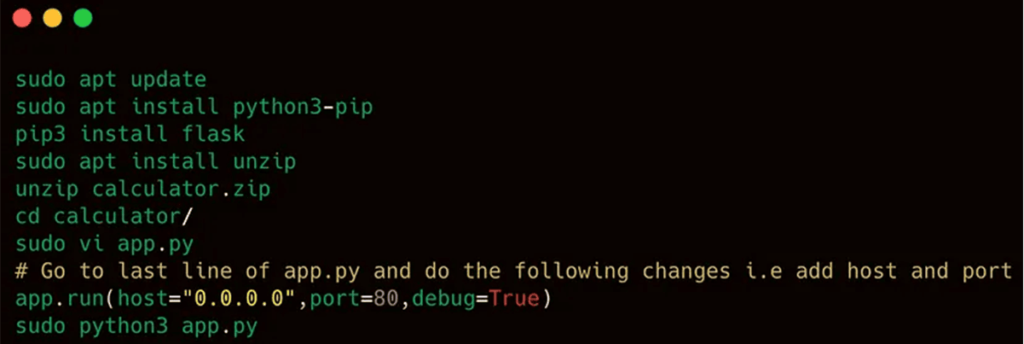
We’ve started our Flask app “app.py,” but it’s only running locally. If we wish to share it with the rest of the world, we must port it to a public IP address from which anybody may access it.
To obtain the public IP address, navigate to your instance and copy the IPv4 public IP address XX.XX.XX.XXX.XXX and paste it into your browser. In the Dev phase, your Calculator App is ready on the public IP.

Note that we will use Flask App but not Flask Server for the following reasons:
- It can’t handle even 100 queries at once.
- It is not scalable.
Flask makes use of Werkzeug’s development server, which, according to the Flask documentation, is not meant to be utilized on production systems. It was created specifically for development and performs badly under high load.
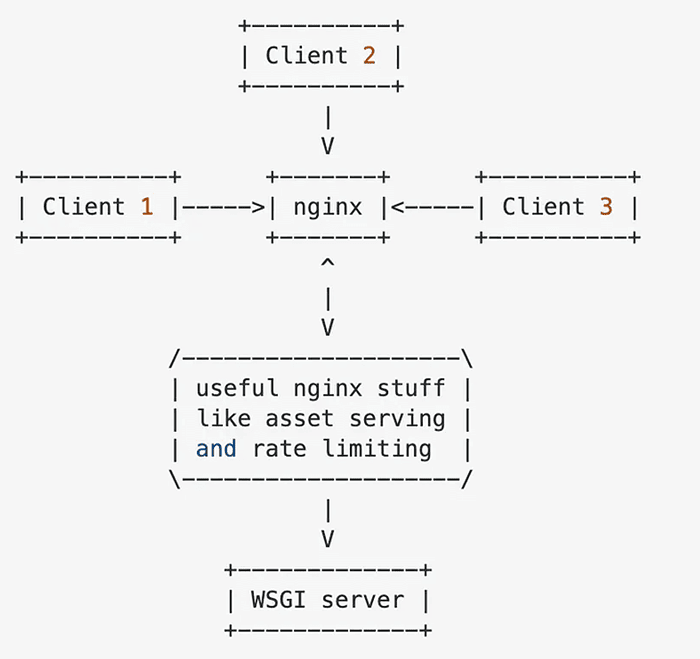
So, in order to maintain it safe and scalable, we will employ Gunicorn (WSGI server) and Nginx with Flask App.
Best security techniques
It is critical to guarantee that your apps are safe in today’s world. To protect your data, infrastructure, and user information, you should follow all security best practices while deploying your React app with Managed AWS Cloud.
Identity and access management: One of the most important considerations when managing security levels is identity and access management. To do this, use IAM roles and rules to manage control and access to your EC2 instances and AWS resources. To improve safety, assign permissions based on the concept of least privilege. Users and programs will only have access to the resources required for their activities in this manner.
Network security: A fully configured set of security groups and network access control lists will manage inbound and outgoing traffic while also ensuring that it works in tandem with your EC2 instances. It is critical to employ Virtual Private Cloud capabilities to quarantine your instances whenever you are not in a secure network environment, especially when using a public network or the internet.
Data encryption: Encryption is required for all data, whether static or dynamic. AWS can help with this since it includes several valuable tools, such as AWS Key Management Service, for maintaining encryption keys and keeping data secret in order to maintain security levels.
Step — 3:- Gunicorn and Nginx Server setup
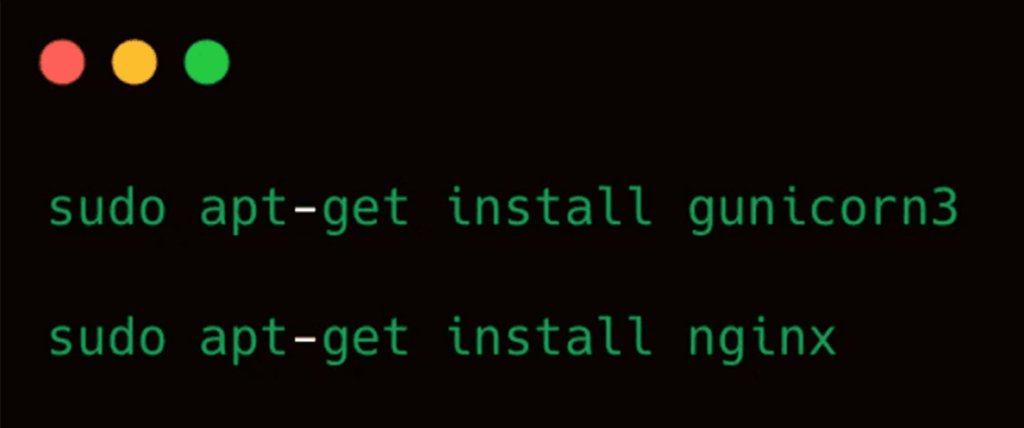
Install gunicorn and nginx using following code :-
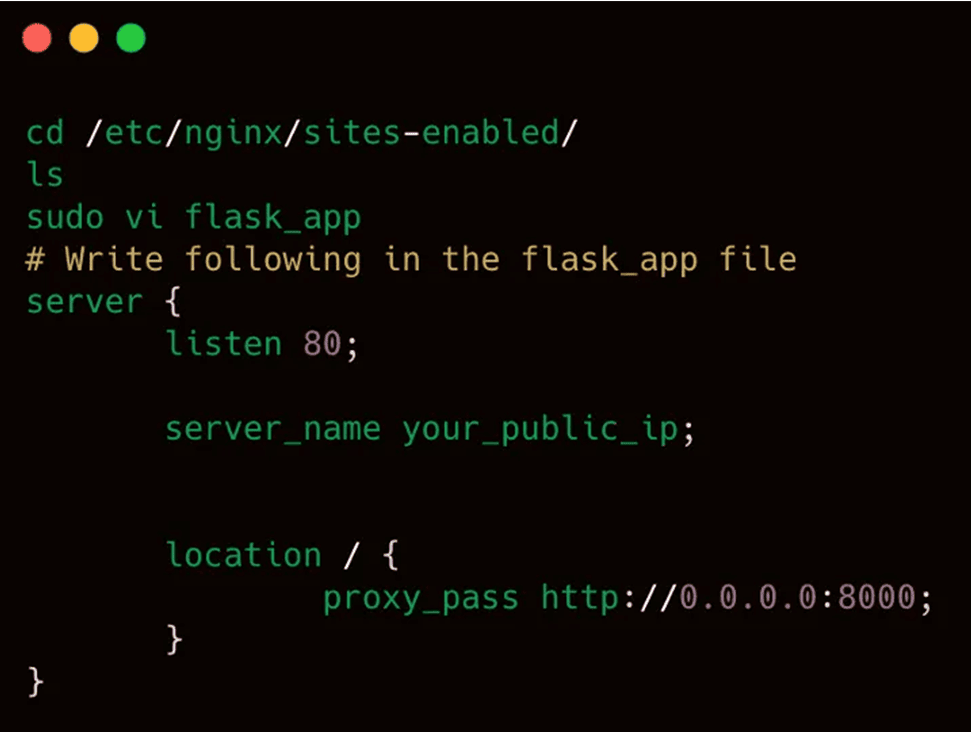
a. Now insert the following code into the nginx setup file. You will receive the default file, which is the nginx configuration file. Make another file called flask_app there.
I’ve switched the webserver from Flask to gunicorn here. We also know that flask was operating on Port 80.
Let us start the gunicorn program and examine its port.
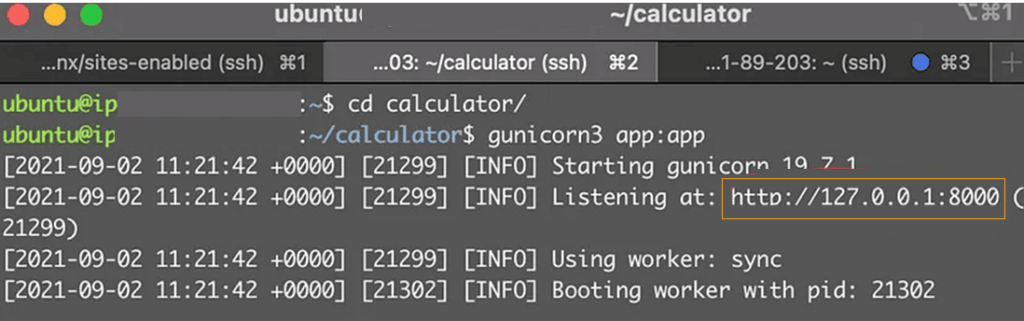
Our app is now operating on port 8000 rather than 80.
Restart nginx now: service sudo nginx reload
Finally, let’s launch our app:
cd calculator/
gunicorn3 app:app
On our public IP, our Calculator app will now look like this:-

Conclusion
We’ve studied the practical procedures required in deploying a Python App to an Amazon Web Service (AWS) EC2 instance, from generating and running the EC2 instance to configuring Gunicorn and Nginx. The practical experience of moving a tiny Python application from your desktop PC to a real production environment is priceless. It is about putting theory into practice.
We realize the importance of practical expertise and flawless deployment at our service. We’re here to make the process easier by providing Managed AWS Cloud services that make your deployment Easy and Quick. Our objective is to free you up to focus on the success of your application while we manage the infrastructure. Contact us to begin your app deployment project with confidence and knowledge.